Retro Striped Crochet Plant Cozy Free Pattern
Retro Striped Crochet Plant Cozy Free Pattern
Introduction
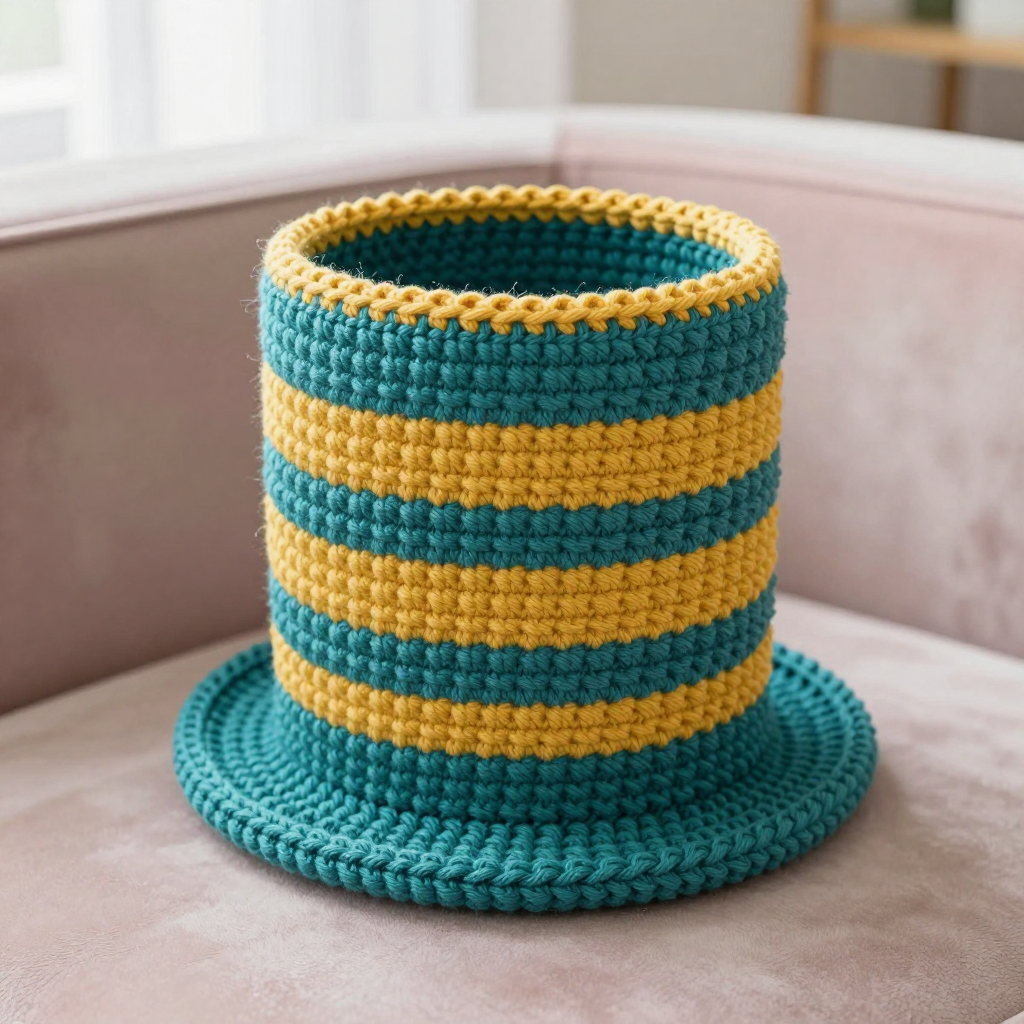
This Retro Striped Crochet Plant Cozy is a quick, cheerful project made for anyone who has just learned single crochet and wants a finished object they can actually use. It is worked in simple continuous rounds, so there is no joining and no seaming to worry about. The alternating teal and mustard bands give it a mid-century modern look that dresses up a plain nursery pot in minutes. It feels dense, smooth, and sturdy in the hand, and it hugs a small pot snugly so it stays put on a shelf or windowsill.
Materials Needed
- Yarn: Worsted weight (category 4) cotton yarn, approximately 50 yards each of Color A (teal) and Color B (mustard).
- Hook: 5.0 mm (H-8) crochet hook.
- Notions: Stitch marker, tapestry needle, scissors.
- Finished size: Approximately 3.5 inches (9 cm) in diameter and 3.5 inches (9 cm) tall, to fit a standard 3-inch pot.
Abbreviations
- ch — chain: make a loop of yarn and pull it through the loop on your hook.
- sc — single crochet: insert hook into stitch, yarn over, pull up a loop, yarn over, pull through both loops.
- sl st — slip stitch: insert hook into stitch, yarn over, pull through both the stitch and the loop on your hook.
- st(s) — stitch(es).
- rnd(s) — round(s).
- [ ] — work everything inside the brackets the number of times stated after them.
Gauge
16 sts and 16 rnds = 4 inches (10 cm) in single crochet. To check it, crochet a small flat swatch in single crochet and measure a 4-inch section; if you have more stitches than 16, go up a hook size, and if you have fewer, go down.
Tips Before You Start
- Work in continuous rounds without joining. Place a stitch marker in the first stitch of each round so you always know where the round begins.
- Keep your single crochet firm and even; a loose fabric will let the pot show through and will sag around the rim.
- Change colors in the last stitch of the round as written, pulling the new color through the final yarn over so the band starts cleanly.
- Do not carry the unused color tightly across the inside; let it rest loosely so the cozy keeps its round shape.
Step-by-Step Instructions
Base and Body
With Color A, make a magic ring. Work in continuous rounds without joining, marking the first stitch of each round.
Rnd 1: 6 sc in ring (6 sts).
Rnd 2: 2 sc in each st around (12 sts).
Rnd 3: [Sc in next st, 2 sc in next st] around (18 sts).
Rnd 4: [Sc in next 2 sts, 2 sc in next st] around (24 sts).
Rnd 5: [Sc in next 3 sts, 2 sc in next st] around (30 sts).
Rnd 6: [Sc in next 4 sts, 2 sc in next st] around (36 sts).
Rnd 7: [Sc in next 5 sts, 2 sc in next st] around (42 sts).
Rnd 8: [Sc in next 6 sts, 2 sc in next st] around (48 sts).
Rnd 9: Sc in each st around (48 sts).
Rnd 10: Sc in each st around, changing to Color B in the last st (48 sts).
Rnds 11-12: With Color B, sc in each st around (48 sts).
Rnd 13: With Color A, sc in each st around (48 sts).
Rnds 14-15: With Color A, sc in each st around (48 sts).
Rnd 16: With Color B, sc in each st around (48 sts).
Rnds 17-18: With Color B, sc in each st around (48 sts).
Rnd 19: With Color A, sc in each st around (48 sts).
Rnds 20-21: With Color A, sc in each st around (48 sts).
Rnd 22: With Color B, sc in each st around (48 sts).
Rnds 23-24: With Color B, sc in each st around (48 sts).
Rnd 25: With Color A, sc in each st around (48 sts). Fasten off.
Edging
With right side facing, join Color B with a sl st in any st of Rnd 25.
Edging Rnd: Ch 1, sc in each st around, join with sl st to first sc. Fasten off.
Assembly and Finishing
There is no seaming; the cozy is worked in one piece. Weave in all ends on the wrong side, running each tail through several stitches in two directions so it does not work loose. Block lightly by misting with water and shaping the cozy over a glass or jar of similar diameter, then let it dry fully so the base stays flat and the sides stay straight. Slip the cozy over your pot, easing the rim over the top edge.
Pro Tips and Variations
- Swap the band colors for any two shades you love; keep the three-round band rhythm for the same retro look.
- For a taller cozy, add extra straight rounds at 48 sts before the edging, working them in three-round color bands.
- Add a contrasting third color for a bolder stripe, or work the edging in Color A for a subtler finish.