Gold Cherry on Ribbed Burgundy: Free Crochet Tote Pattern
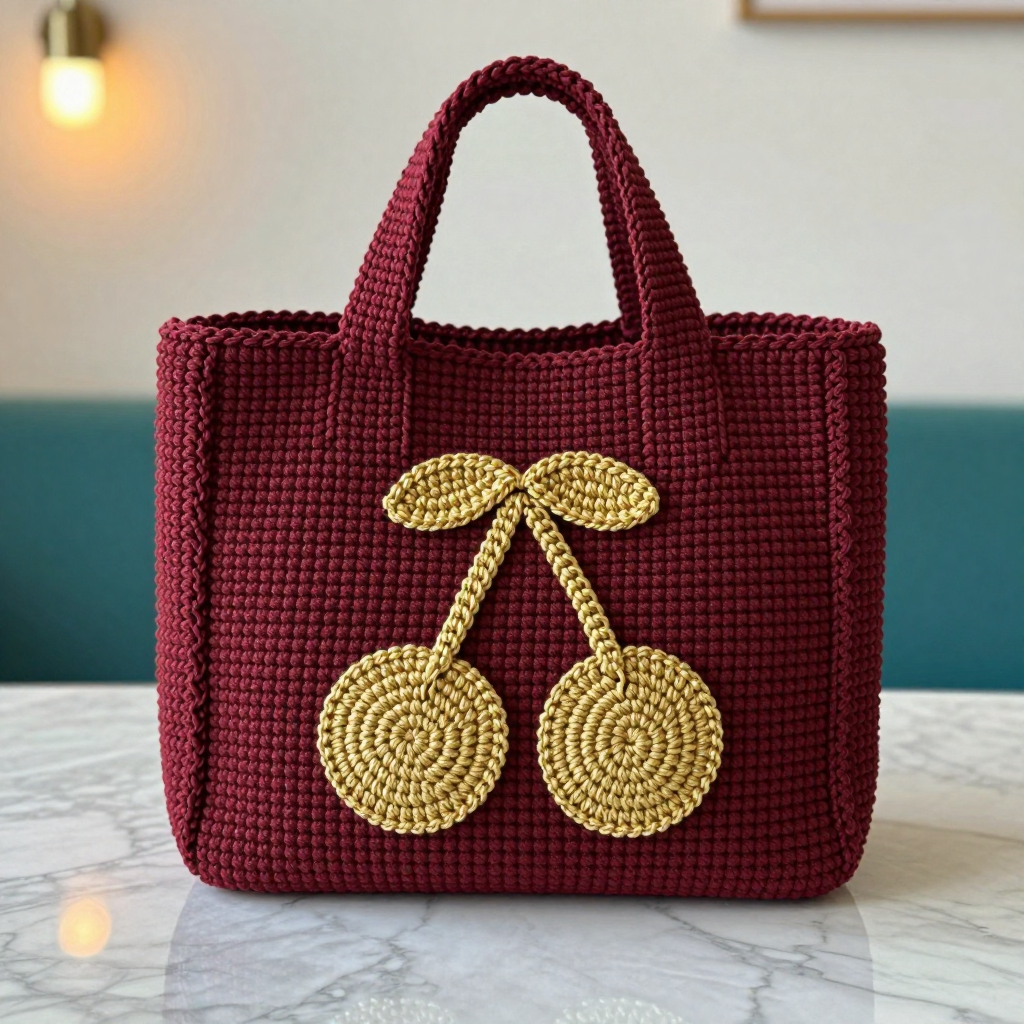
Gold Cherry on Ribbed Burgundy: Free Crochet Tote Pattern
Introduction
This roomy tote is made for crocheters who love texture and a little bit of drama in their accessories. Worked sideways in sturdy burgundy t-shirt yarn, the body uses front and back post double crochet ribbing to create deep vertical ridges that feel thick and satisfying in the hand. A pair of stuffed gold cherry circles and a gently curved stem sit low on the front panel, giving the bag a warm, harvest-inspired look that's perfect for fall and Thanksgiving. It's an experienced-level project, but every step is clearly laid out below, so if you've crocheted post stitches before, you can absolutely make this bag.
Materials Needed
- Yarn: T-shirt yarn (approx. 5–7 mm wide), bulky weight, 100% cotton. Main color (MC) burgundy: 350 yards. Contrast color (CC) gold: 50 yards.
- Hook: 8 mm (US L-11) crochet hook.
- Notions: Tapestry needle, stitch markers, scissors, small amount of polyester fiberfill for the cherries.
- Finished size: Approx. 14 inches wide x 16 inches tall (excluding handles), with 10-inch handles.
Abbreviations
- ch – chain
- sc – single crochet
- dc – double crochet
- sl st – slip stitch
- inc – increase (work 2 sc in the same stitch)
- dec – decrease (work 2 sc together)
- Fpdc – front post double crochet (work the dc around the post of the stitch in front, pushing the post toward you)
- Bpdc – back post double crochet (work the dc around the post of the stitch behind, pushing the post away from you)
- Fpsc – front post single crochet (work the sc around the post of the stitch in front)
- Bpsc – back post single crochet (work the sc around the post of the stitch behind)
- MR – magic ring
- RS – right side
- MC / CC – main color / contrast color
Gauge
12 stitches and 12 rows = 4 inches in the post rib pattern. Work a small swatch in the post rib pattern and measure a 4-inch section; if you have more stitches than 12, go up a hook size, and if you have fewer, go down.
Tips Before You Start
- T-shirt yarn has very little stretch and a lot of grip, so keep your tension relaxed and let the hook do the work rather than tugging.
- Post stitches are easiest when you tilt the hook toward you to find the post; count your stitches every row so the rib stays even.
- Because the bag is worked sideways, the ribbing runs vertically on the finished bag — trust the process, the panels will look wider than tall while you work them.
- Stuff the cherry circles lightly and evenly so they stay round and flat against the panel rather than bulging.
Step-by-Step Instructions
Bag Panel (make 2, MC)
Row 1: Ch 49, dc in 4th ch from hook and each ch across (46 dc).
Row 2: Ch 2, turn, [Fpdc, Bpdc] across, ending with Fpdc (46 sts).
Rows 3–48: Repeat Row 2 (46 sts).
Fasten off. Each panel measures approx. 16 inches wide x 14 inches tall before joining.
Cherry Circles (make 2, CC)
Rnd 1: MR, 6 sc (6 sts).
Rnd 2: Inc x6 (12 sts).
Rnd 3: [sc, inc] x6 (18 sts).
Rnd 4: [2 sc, inc] x6 (24 sts).
Rnd 5: sc in each st (24 sts).
Rnd 6: [2 sc, dec] x6 (18 sts).
Rnd 7: [sc, dec] x6 (12 sts). Stuff lightly.
Rnd 8: dec x6 (6 sts). Close the opening.
Stem (CC)
Row 1: Ch 15, sl st in 2nd ch from hook and each ch across (14 sl sts). Fasten off.
Joining the Panels
With RS together, sc around the sides and bottom through both panels, working 1 sc per row along the sides and 1 sc per stitch along the bottom. Fasten off.
Top Edging (MC)
Rnd 1: Join MC to top edge, sc evenly around (approx. 46 sc).
Rnd 2: [Fpsc, Bpsc] around. Fasten off.
Handles (make 2, MC)
Row 1: Ch 31, sc in 2nd ch from hook and each ch across (30 sc).
Rows 2–3: Ch 1, turn, sc in each st across (30 sc). Fasten off.
Assembly and Finishing
With RS facing, sew the cherry circles to the front panel using the photo as a guide, positioning them side by side with bottom edges 1 inch above the lower edge and 1 inch apart. Sew the stem above the cherries, curving it slightly. Sew the handle ends to the inside top edge, 4 inches apart on each side. Weave in all ends. Block lightly by misting with water and shaping flat, then let dry completely before use.
Pro Tips and Variations
- Swap the gold cherries for deep green leaves and a brown stem for a different seasonal look.
- Add a fabric lining for extra structure and to keep small items from slipping through the stitches.
- Work the handles in the post rib pattern for a textured strap that matches the bag body.


