Flame Stripe Mug Cozy Free Crochet Pattern
Introduction
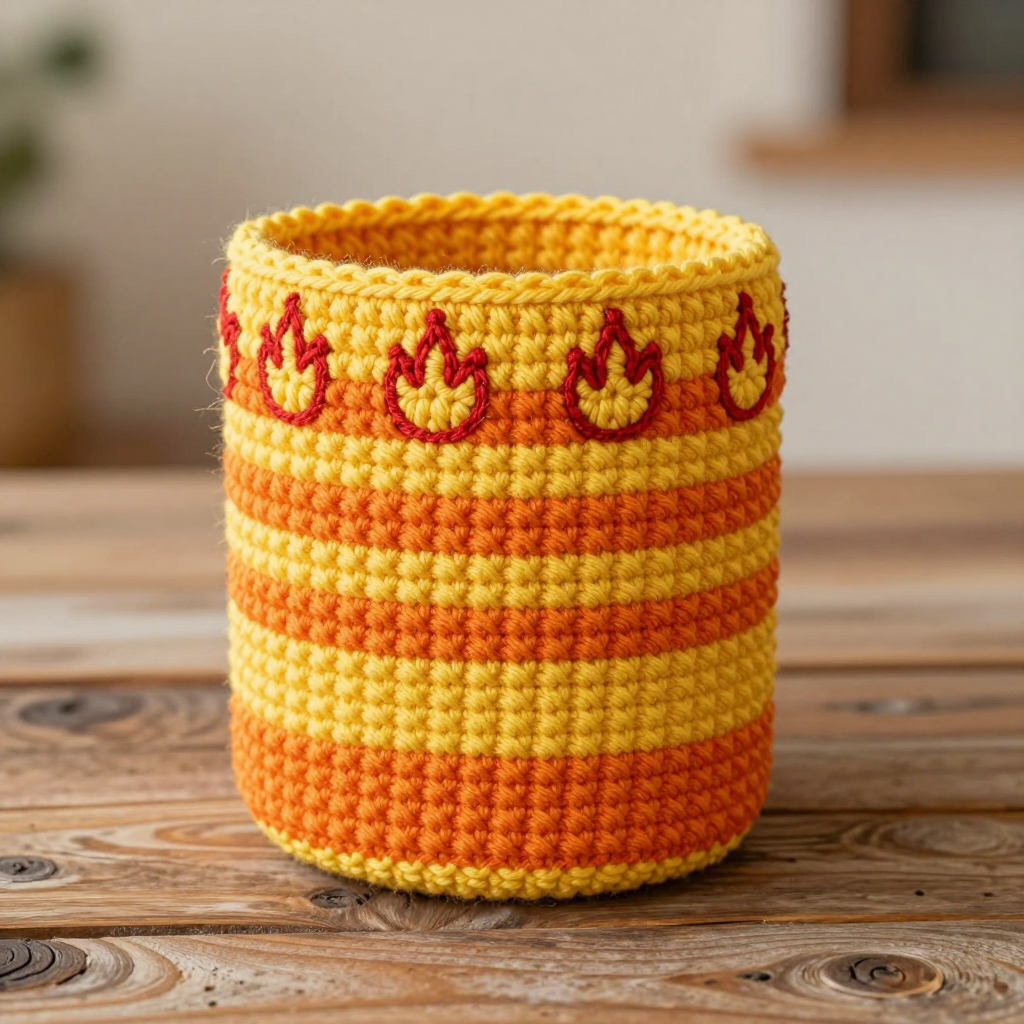
This Flame Stripe Mug Cozy is a fun, fast project that turns a plain mug into a little piece of Y2K skater style. It's written for crocheters who are comfortable with double crochet and joined rounds and want to try a bit of simple embroidery. The cozy is a straight, open-ended tube worked in bold horizontal stripes of orange and yellow, with a yellow single-crochet edging at both rims and four small red embroidered flames spaced around the top. It feels snug and soft in cotton, slips easily over a standard mug, and adds a fiery pop of color to your desk or coffee table.
Materials Needed
- Yarn: DK weight (3) cotton yarn — 30 yd orange (A), 20 yd yellow (B), 10 yd red (C)
- Hook: 4 mm (G-6)
- Notions: Tapestry needle for weaving in ends and embroidery, scissors, stitch marker (optional, for marking the first stitch of each round)
- Finished size: Approx. 9.5 inches circumference x 3 inches tall (fits a standard mug)
Abbreviations
- ch — chain
- sl st — slip stitch
- sc — single crochet
- dc — double crochet
- st(s) — stitch(es)
- rnd — round
- A, B, C — orange, yellow, and red yarn
Gauge
14 sts and 8 rows = 4 inches in dc. To check, crochet a small swatch in dc and measure a 4-inch section; adjust your hook size if you have more or fewer stitches than this.
Tips Before You Start
- Join each round with a sl st to the first dc, then begin the next round with ch 2 — this keeps the tube edges even and the stripes straight.
- Change colors on the last yarn-over of the final stitch of a round so the new color starts cleanly at the join.
- Keep your tension relaxed; a too-tight tube will be hard to slide over the mug.
- Try the cozy on your mug as you go — the tube should fit snugly but still slip on and off easily.
Step-by-Step Instructions
Cozy (worked in rounds)
Setup: With A, ch 34, join with sl st to first ch to form ring.
Rnd 1: Ch 2, dc in each ch around, join with sl st to first dc (34 dc).
Rnd 2: Ch 2, dc in each st around, join (34 dc).
Change to B.
Rnd 3: Ch 2, dc in each st around, join (34 dc).
Rnd 4: Ch 2, dc in each st around, join (34 dc).
Change to A.
Rnd 5: Ch 2, dc in each st around, join (34 dc).
Rnd 6: Ch 2, dc in each st around, join (34 dc).
Change to B.
Rnd 7: Ch 2, dc in each st around, join (34 dc).
Rnd 8: Ch 2, dc in each st around, join (34 dc).
Change to A.
Rnd 9: Ch 2, dc in each st around, join (34 dc).
Rnd 10: Ch 2, dc in each st around, join (34 dc). Fasten off.
Edging (top and bottom)
Top edge: Join B with sl st to any st of the top edge, ch 1, sc in each st around, join with sl st to first sc (34 sc). Fasten off.
Bottom edge: Join B with sl st to any st of the bottom edge, ch 1, sc in each st around, join with sl st to first sc (34 sc). Fasten off.
Embroidered Flames (make 4)
With C, use straight stitch to embroider flame shapes evenly spaced around the top edge, each flame about 1 inch tall. Work each flame as a few straight stitches fanning upward from a narrow base to a wider top, then add a short stitch or two inside for the inner flame detail.
Assembly and Finishing
Weave in all ends on the wrong side of the cozy, tucking them under nearby stitches so they don't show. Gently steam-block the tube to even out the stripes and edging, shaping it into a smooth cylinder while damp and letting it dry flat. Slip the cozy onto your mug and adjust the embroidered flames so they sit evenly around the rim.
Pro Tips and Variations
- Swap the stripe order or add a third color band for a different gradient effect.
- Use a contrasting yarn for the edging to make the rims pop.
- Embroider the flames in metallic or glow-in-the-dark thread for extra Y2K flair.