Crochet Charming Smiling Duck Potholder Free Pattern
Introduction
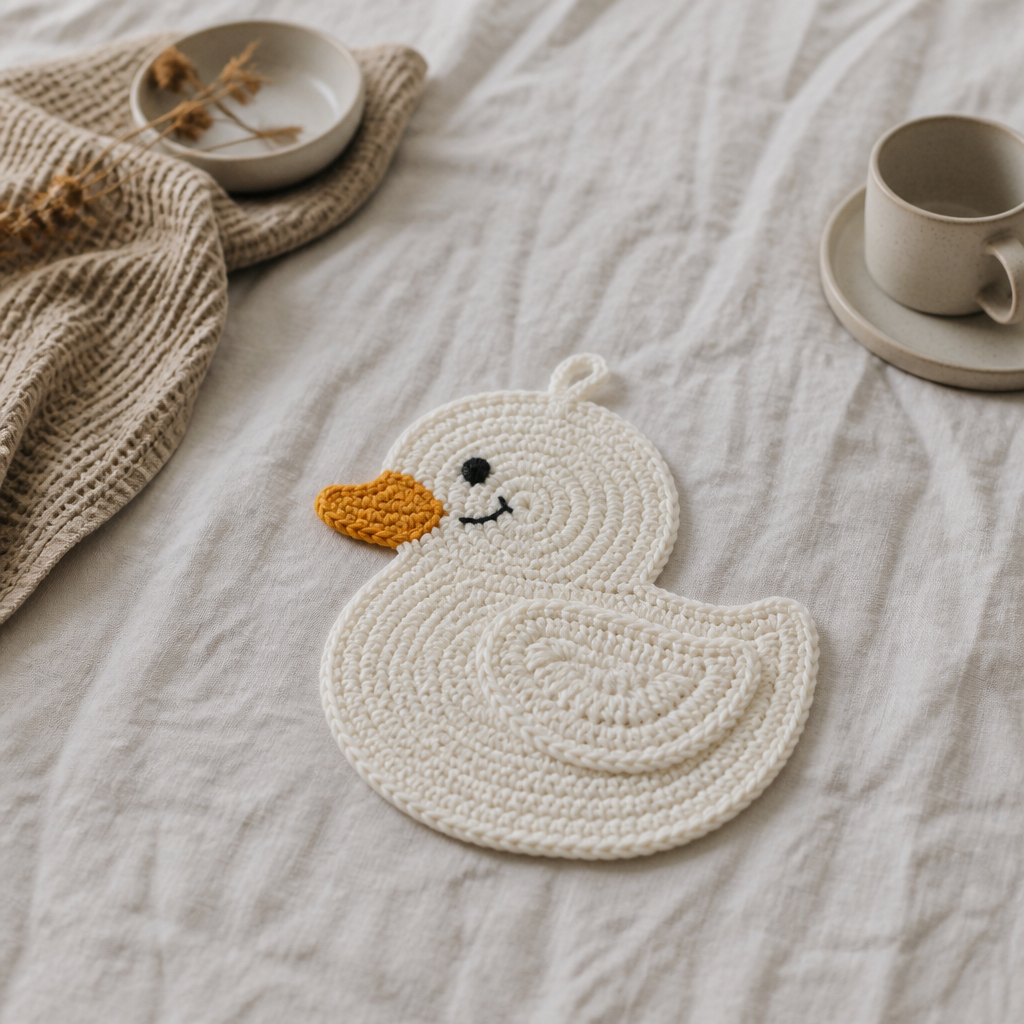
This cheerful smiling duck potholder is the perfect little project for anyone who wants to add a splash of whimsy to their kitchen. Worked in soft white cotton with a bright orange beak and a friendly embroidered face, it looks just as sweet hanging on a hook as it does protecting your hands from a hot pan. The two-layer construction makes it thick enough to be genuinely useful, while the simple single crochet shaping keeps it friendly for beginners. Whether you are new to crochet or a seasoned maker looking for a quick weekend win, this duck will make you smile every time you reach for it.
Materials Needed
- Yarn: I Love This Cotton (worsted weight, 100% cotton), 2 oz. white for the body, head, and wing embroidery
- Yarn: 6 yards orange (beak)
- Yarn: 4 yards black (eye and smile)
- Hook: Size I (5.5 mm)
- Notions: Yarn needle, stitch marker
- Finished size: Approximately 7 inches (18 cm) wide and 8 inches (20 cm) tall, including the head
Abbreviations
- ch = chain
- sc = single crochet
- inc = increase (work 2 sc in the same stitch)
- sc2tog = single crochet 2 together (a decrease: insert hook in next st, pull up a loop, insert hook in following st, pull up a loop, yarn over and pull through all 3 loops)
- sl st = slip stitch
- st = stitch
Gauge
14 sc and 16 rounds = 4 inches (10 cm) in single crochet worked in spiral rounds. To check, crochet a small swatch in the round and measure the stitch and round counts across 4 inches before starting.
Tips Before You Start
- Both layers are worked in continuous spiral rounds without joining, so keep your stitch marker in the first stitch of each round and move it up as you go.
- Cotton yarn is the best choice for a potholder because it handles heat well; avoid acrylic for anything that touches hot pans.
- Work your stitches firmly and evenly so the two layers sit flat together and the finished potholder stays thick and safe.
- Leave generous tails on the beak and hanging loop so you have plenty of yarn to sew securely through both layers.
Step-by-Step Instructions
Body and Head (make 2)
Work in white yarn. The piece starts at the bottom of the body and is shaped to form a rounded body with a narrower neck and a rounded head at the top. Work in continuous spiral rounds; do not join rounds.
Rnd 1: Make a magic ring, ch 1, work 6 sc into the ring. Do not join. Place marker in first st (6 sts).
Rnd 2: inc in each st around (12 sts).
Rnd 3: [sc, inc] x6 (18 sts).
Rnd 4: [2 sc, inc] x6 (24 sts).
Rnd 5: [3 sc, inc] x6 (30 sts).
Rnd 6: [4 sc, inc] x6 (36 sts).
Rnd 7: [5 sc, inc] x6 (42 sts).
Rnd 8: [6 sc, inc] x6 (48 sts).
Rnd 9: [7 sc, inc] x6 (54 sts).
Rnd 10: [8 sc, inc] x6 (60 sts).
Rnds 11-20: sc in each st around (60 sts).
Rnd 21: [8 sc, sc2tog] x6 (54 sts).
Rnd 22: [7 sc, sc2tog] x6 (48 sts).
Rnd 23: [6 sc, sc2tog] x6 (42 sts).
Rnd 24: [5 sc, sc2tog] x6 (36 sts).
Rnd 25: [4 sc, sc2tog] x6 (30 sts).
Rnd 26: [3 sc, sc2tog] x6 (24 sts).
Rnd 27: [2 sc, sc2tog] x6 (18 sts).
Rnd 28: [1 sc, sc2tog] x6 (12 sts).
Rnd 29: sc2tog around (6 sts).
Fasten off, leaving a long tail. Weave the tail through the remaining 6 sts and pull tight to close. Weave in the end.
Assembly of the Two Layers
Step 1: Place the two body/head pieces together with wrong sides facing (or right sides facing if you prefer a smoother outside; either is acceptable for a potholder).
Step 2: Join white yarn with a sl st at the bottom center. Work sc evenly around the entire outer edge, inserting the hook through both layers, to join them. Work approximately 1 sc in each st or row end around, keeping the edge flat. When you reach the top of the head, work 3 sc in the center top stitch to create a slight point for the hanging loop placement. Continue around and join with sl st to the first sc. Fasten off and weave in ends.
Beak
Work in orange yarn.
Row 1: ch 6, sc in second ch from hook and each ch across (5 sts).
Rows 2-3: sc in each st across (5 sts).
Fasten off, leaving a long tail for sewing. Sew the beak onto the front of the head, centered horizontally, about 1 inch below the top of the head, curving slightly upward. Use the tail to secure all edges.
Eye and Smile
Eye: Using black yarn and a yarn needle, embroider a small circle for the eye on the front of the head, about 0.5 inch above and to one side of the beak. Make a few straight stitches to fill a circle about 1/4 inch in diameter.
Smile: Embroider a curved line for the smile just below the eye, starting near the beak and curving upward. Use a simple backstitch or straight stitch.
Wing (embroidered)
Using white yarn and a yarn needle, embroider a wing on the front body, centered on one side. The wing should be a simple curved shape, about 2 inches long and 1 inch wide, made with satin stitches or a series of straight stitches following the curve. Start near the neck area and curve downward and outward.
Hanging Loop
Step 1: With white yarn, ch 10. Join with sl st to form a ring, or simply leave as a chain. Fasten off, leaving tails.
Step 2: Fold the chain in half and sew both ends securely to the top center of the head, at the point created during assembly. Use a yarn needle and the tails to stitch through all layers. Weave in ends.
Assembly and Finishing
Once both layers are joined, the beak, face, and wing are added on the front as described above, and the hanging loop is sewn to the top point. Weave in all remaining ends on the wrong side, working each tail back and forth through a few stitches so it stays put. Block lightly if desired by misting with water and patting the potholder flat into shape, then let it dry completely before hanging.
Pro Tips and Variations
- Make a matching set in different colors, such as a pale yellow duck or a soft grey duck, to brighten up your kitchen rotation.
- For a thicker, extra-safe potholder, add a third layer or slip a piece of cotton batting between the two layers before joining the edges.
- Swap the embroidered eye for a small safety eye or a tiny crocheted circle if you prefer a bolder face, and adjust the smile curve to give your duck a different personality.