Rainbow Stripe Baby Beanie Free Crochet Pattern
Introduction
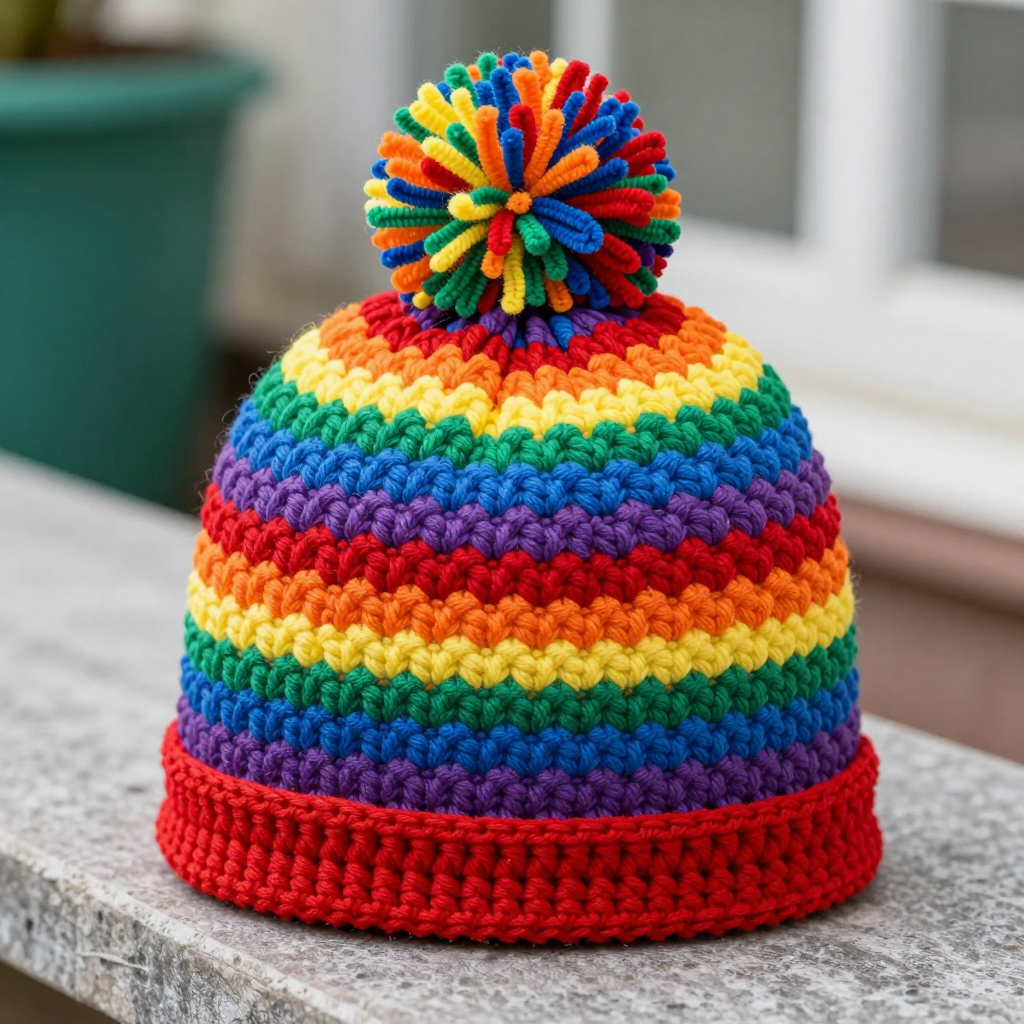
This Rainbow Stripe Baby Beanie is the sweetest little throwback project — a vintage-inspired hat with horizontal rainbow stripes, a snug rolled brim, and a fluffy pom-pom on top. It's designed for beginners who know their basic stitches and want to practice color changes without any complicated shaping. The finished hat is soft, stretchy, and lightweight, perfect for a 0–6 month baby, and the classic 1970s look makes it a wonderful unisex gift or photo prop. With just basic double crochet rounds and a simple single crochet brim, it works up quickly in an evening or two.
Materials Needed
- Yarn: Worsted weight (category 4) acrylic yarn in six colors — red (A), orange (B), yellow (C), green (D), blue (E), purple (F). Approximately 30 yards of each color (180 yards total).
- Hook: 4.0 mm (G/6) crochet hook
- Notions: Stitch marker, tapestry needle, scissors, and a pom-pom maker or a piece of cardboard for a 2-inch pom-pom
- Finished size: Fits 0–6 months — circumference 14 inches (35.5 cm), height 6 inches (15 cm) including brim
Abbreviations
- MR — magic ring: an adjustable loop used to start working in the round
- dc — double crochet
- sc — single crochet
- inc — increase: work 2 stitches into the same stitch
- st(s) — stitch(es)
- R / Rnd — round
- [ ] x6 — repeat the instructions inside the brackets six times
Gauge
12 double crochet stitches = 4 inches (10 cm) and 6 rounds = 4 inches (10 cm) in double crochet. To check, crochet a small flat swatch in the round and measure a 4-inch section; adjust your hook size if your stitches are much larger or smaller than this.
Tips Before You Start
- Change colors on the last yarn-over of the final stitch of a round so the new color begins cleanly at the start of the next round.
- Use a stitch marker in the first stitch of each round — the spiral join can be easy to lose track of.
- Keep your tension even, especially at color changes, so the stripes lie flat and the hat stays a smooth cylinder.
- Don't cut yarn after every stripe if you like — carry colors loosely up the inside, or cut and weave in as you go for a neater finish.
Step-by-Step Instructions
Hat (worked in rounds from crown to brim)
Rnd 1: With A, make a magic ring and work 6 dc into it (6 sts). Pull the ring closed.
Rnd 2: inc in each st around (12 sts).
Rnd 3: [dc, inc] x6 (18 sts).
Rnd 4: [2 dc, inc] x6 (24 sts).
Rnd 5: [3 dc, inc] x6 (30 sts).
Rnd 6: [4 dc, inc] x6 (36 sts).
Rnd 7: [5 dc, inc] x6 (42 sts).
Rnd 8: [6 dc, inc] x6 (48 sts).
Rnd 9: [7 dc, inc] x6 (54 sts).
Rnd 10: [8 dc, inc] x6 (60 sts).
Rnd 11: dc in each st around (60 sts). Change to B.
Rnds 12–13: dc in each st around (60 sts). Change to C.
Rnds 14–15: dc in each st around (60 sts). Change to D.
Rnds 16–17: dc in each st around (60 sts). Change to E.
Rnds 18–19: dc in each st around (60 sts). Change to F.
Rnds 20–21: dc in each st around (60 sts). Change to A.
Rnds 22–23: dc in each st around (60 sts). Change to B.
Rnds 24–25: dc in each st around (60 sts). Change to C.
Rnds 26–27: dc in each st around (60 sts). Change to D.
Rnds 28–29: dc in each st around (60 sts). Change to E.
Rnds 30–31: dc in each st around (60 sts). Change to F.
Rnds 32–33: dc in each st around (60 sts). Do not fasten off.
Brim
Rnd 34: Change to A. sc in each st around (60 sts).
Rnds 35–38: sc in each st around (60 sts). Fasten off.
Pom-pom
Make a pom-pom using all six colors (or just red) with a 2-inch (5 cm) diameter. Trim it evenly, then attach it securely to the top center of the hat.
Assembly and Finishing
Weave in all yarn ends on the inside of the hat, taking care to secure the color-change tails so they don't work loose. Use your tapestry needle to stitch the pom-pom firmly through the crown, knotting it on the inside. Gently steam or wet-block the hat over a small bowl or balloon to smooth the stripes and even out the brim, then let it dry completely before wearing.
Pro Tips and Variations
- Swap the six rainbow colors for a two-color team palette, or use a self-striping yarn to skip the color changes entirely.
- Make the brim wider by adding a few more single crochet rounds for a deeper rolled cuff that grows with baby.
- Skip the pom-pom and add a small crochet flower or button for a simpler, safer newborn accessory.