Potted Sprout Square Free Crochet Pattern
Introduction
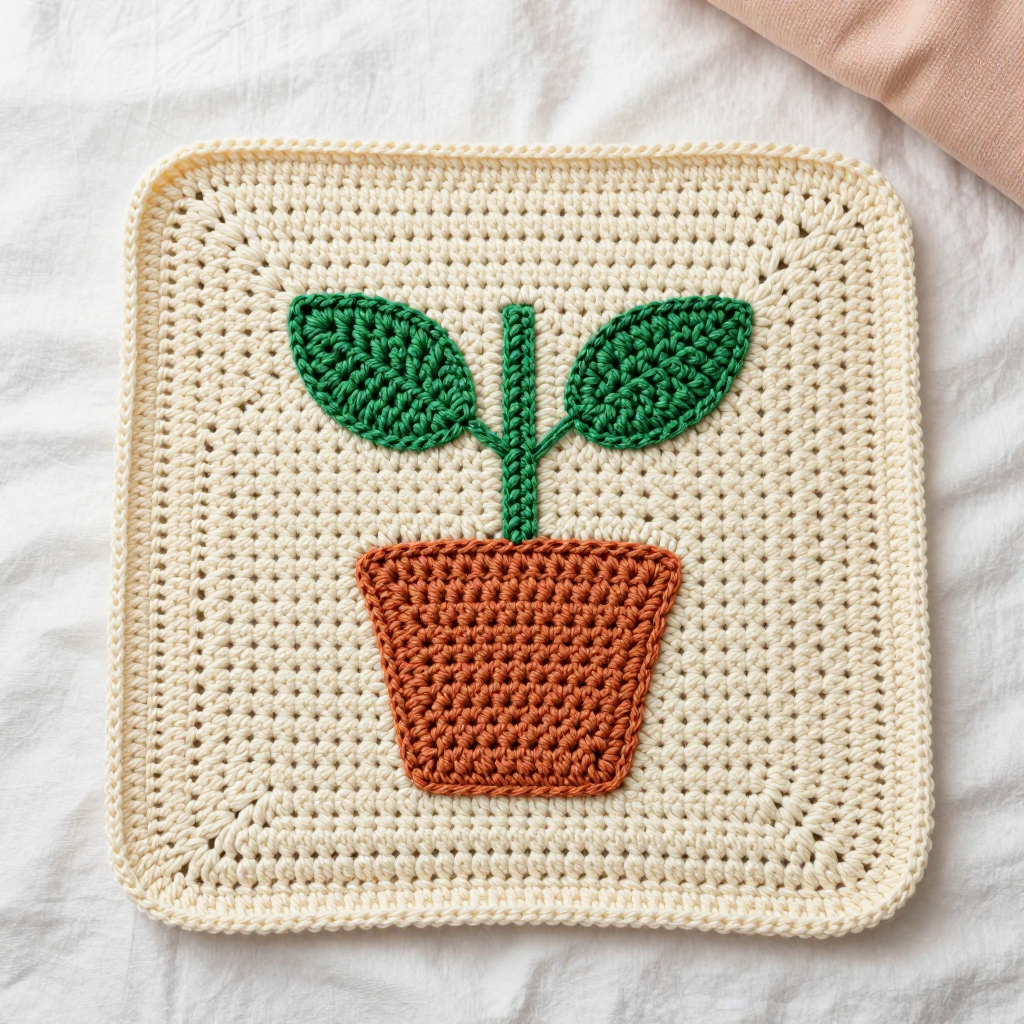
The Potted Sprout Square is a cheerful 12-inch afghan block that brings a little garden indoors. It's designed for confident beginners: the background is plain double crochet worked in the round, and the pot, stalk, and leaves are simple flat pieces you sew on at the end. The look is whimsical and clean — a flat terracotta pot with a straight rim, a slim green stalk, and two leaves angled outward on a soft cream background. Worked in worsted-weight acrylic, it feels smooth, sturdy, and cozy, and it's ready to join into any blanket.
Materials Needed
- Yarn: Worsted weight (4) acrylic yarn — Cream (A) 150 yds, Terracotta (B) 40 yds, Green (C) 30 yds
- Hook: 6.0 mm (J/10)
- Notions: Tapestry needle, stitch marker, scissors, rust-proof pins for blocking
- Finished size: 12 x 12 inches
Abbreviations
- ch — chain
- sl st — slip stitch
- sc — single crochet
- hdc — half double crochet
- dc — double crochet
- sc2tog — single crochet two stitches together (a decrease)
- beg — beginning
- st(s) — stitch(es)
- R / Rnd — row / round
Gauge
14 dc x 7 rows = 4 inches. Work a small swatch in double crochet and measure the center of it; if you have more stitches than 14 in 4 inches, go up a hook size, and if you have fewer, go down.
Tips Before You Start
- Each background round begins with a ch 3 that counts as the first dc, and the "dc in same st" is worked into the same stitch as that ch 3 — this keeps the increase count correct.
- Keep your tension even on the pot's decrease rows; the taper should be smooth and symmetrical on both sides.
- Pin all appliqué pieces in place before sewing so you can adjust the stalk and leaf angles to your liking.
- Block the finished square to exactly 12 x 12 inches so it joins easily with other blocks.
Step-by-Step Instructions
Pot (B)
R1: Ch 21, sc in 2nd ch from hook and each ch across (20 sts).
R2-10: Ch 1, turn, sc in each st across (20 sts).
R11: Ch 1, turn, sc2tog, sc in next 16, sc2tog (18 sts).
R12: Ch 1, turn, sc2tog, sc in next 14, sc2tog (16 sts).
R13: Ch 1, turn, sc2tog, sc in next 12, sc2tog (14 sts).
R14: Ch 1, turn, sc2tog, sc in next 10, sc2tog (12 sts).
R15: Ch 1, turn, sc2tog, sc in next 8, sc2tog (10 sts).
R16: Ch 1, turn, sc2tog, sc in next 6, sc2tog (8 sts).
R17: Ch 1, turn, sc2tog, sc in next 4, sc2tog (6 sts).
R18: Ch 1, turn, sc2tog, sc in next 2, sc2tog (4 sts).
R19: Ch 1, turn, sc2tog twice (2 sts).
R20: Ch 1, turn, sc2tog (1 st). Fasten off.
Pot Rim (B)
Join B to the top right corner of the pot. Work 20 sc evenly across the top edge. Fasten off.
Stalk (C)
R1: Ch 3, sc in 2nd ch from hook and next ch (2 sts).
R2-20: Ch 1, turn, sc in each st across (2 sts). Fasten off.
Leaves (C) — make 2
R1: Ch 6, sc in 2nd ch from hook, hdc in next, dc in next 2, hdc in next, sc in last (6 sts).
R2: Ch 1, turn, sc in first, hdc in next, dc in next 2, hdc in next, sc in last (6 sts).
R3: Ch 1, turn, sc2tog, sc in next 2, sc2tog (4 sts).
R4: Ch 1, turn, sc2tog twice (2 sts). Fasten off.
Background (A)
R1: Ch 4, 11 dc in 4th ch from hook, join with sl st to top of beg ch-4 (12 sts).
R2: Ch 3, dc in same st, 2 dc in each st around, join (24 sts).
R3: Ch 3, dc in same st, dc in next, [2 dc in next, dc in next] around, join (36 sts).
R4: Ch 3, dc in same st, dc in next 2, [2 dc in next, dc in next 2] around, join (48 sts).
R5: Ch 3, dc in same st, dc in next 3, [2 dc in next, dc in next 3] around, join (60 sts).
R6: Ch 3, dc in same st, dc in next 4, [2 dc in next, dc in next 4] around, join (72 sts).
R7: Ch 3, dc in same st, dc in next 5, [2 dc in next, dc in next 5] around, join (84 sts).
R8: Ch 3, dc in same st, dc in next 6, [2 dc in next, dc in next 6] around, join (96 sts).
R9: Ch 3, dc in same st, dc in next 7, [2 dc in next, dc in next 7] around, join (108 sts).
R10: Ch 3, dc in same st, dc in next 8, [2 dc in next, dc in next 8] around, join (120 sts).
R11: Ch 3, dc in same st, dc in next 9, [2 dc in next, dc in next 9] around, join (132 sts).
R12: Ch 3, dc in same st, dc in next 10, [2 dc in next, dc in next 10] around, join (144 sts).
R13: Ch 1, sc in each st around, join (144 sts). Fasten off.
Assembly and Finishing
Center the pot on the lower third of the square with its straight edge at the bottom. Pin and sew in place using B. Center the stalk above the pot, overlapping the pot rim slightly; pin and sew using C. Attach the leaves at the top of the stalk, angled outward, and sew using C. Weave in all ends. Block the square to 12 x 12 inches, pinning the corners square, and let it dry completely.
Pro Tips and Variations
- Swap the terracotta for a cool gray or navy pot for a modern look, or use a variegated green for the leaves.
- Add a small embroidered flower or a few French knots above the leaves for extra charm.
- Make several squares in different pot colors and join them into a garden-themed blanket or pillow front.