Flower Power Cocoon Free Crochet Pattern
Flower Power Cocoon Free Crochet Pattern
Introduction
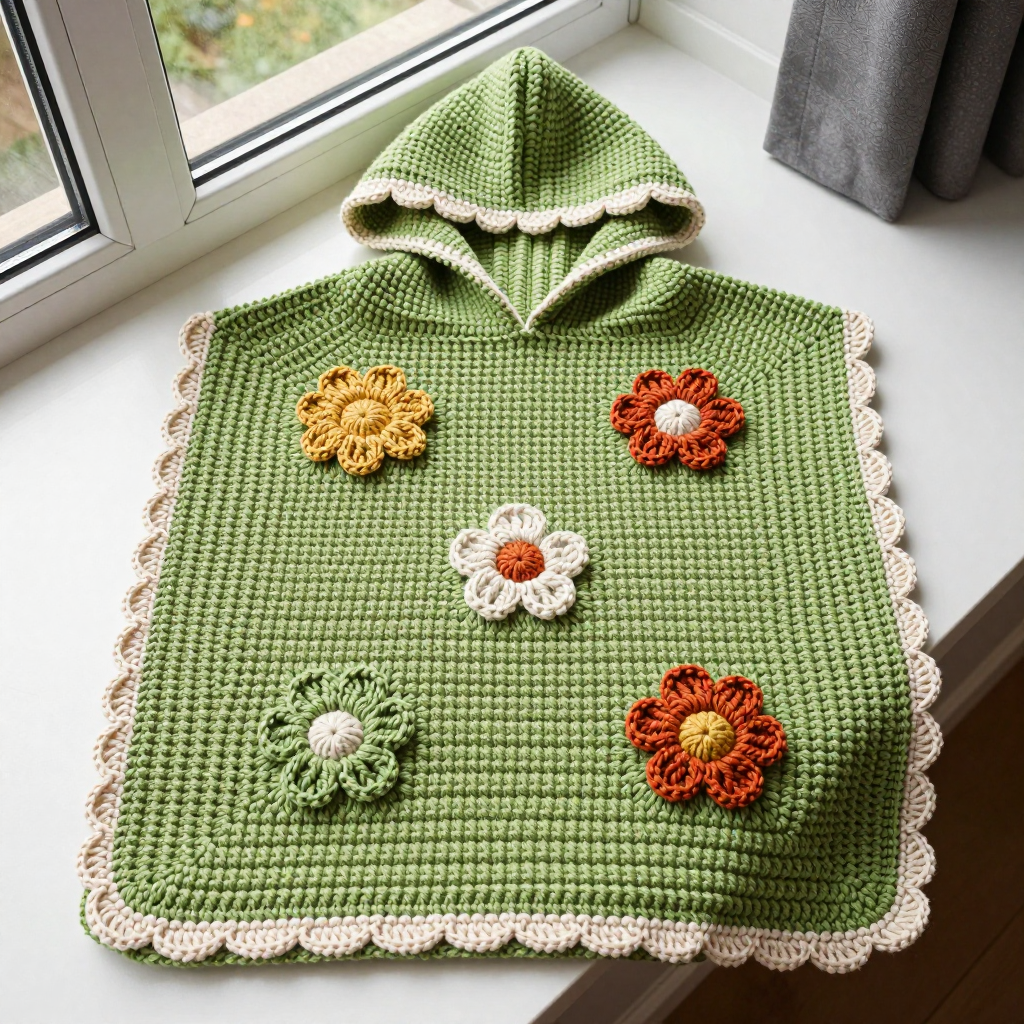
This Flower Power Cocoon is a love letter to the 1970s, and it is just as cozy as it is cute. It is designed for crocheters who are comfortable with double crochet and ready to add a few fun details, and it makes a wonderful photo prop, baby shower gift, or snuggly sack for chilly days. The body is a simple avocado green rectangle folded into a sack with a little hood, then dressed up with a cream scalloped edge and five big retro flowers in harvest gold, burnt orange, rust, and cream. The finished cocoon looks warm and vintage, with a soft, dense fabric that holds its shape beautifully around a baby.
Materials Needed
- Yarn: Worsted weight (4) acrylic yarn. Main color (A) avocado green: 300 yds. Contrast colors: harvest gold (B), burnt orange (C), rust (D), and cream (E): 50 yds each.
- Hook: 6.0 mm (J/10) crochet hook.
- Notions: Tapestry needle, stitch markers, scissors, and a measuring tape.
- Finished size: Baby: 12" wide x 23" long (fits 0-6 months). Toddler: 16" wide x 30" long (fits 6-18 months). Child: 19" wide x 36" long (fits 2-4 years). Instructions are written for Baby with Toddler and Child counts in parentheses.
Abbreviations
- ch: chain
- sc: single crochet
- dc: double crochet
- sl st: slip stitch
- st(s): stitch(es)
- sk: skip
- rep: repeat
- MR: magic ring (an adjustable loop)
Gauge
7 sts x 4 rows = 2 inches in double crochet. Work a small swatch in double crochet and measure the middle of the fabric; if you have more stitches than 7 per 2 inches, go up a hook size, and if you have fewer, go down.
Tips Before You Start
- Keep your double crochet turning chains loose so the side edges stay flat and easy to seam.
- Count your stitches at the end of every row; the body stays at the same stitch count the whole way, so any drift is easy to catch early.
- Place a stitch marker at the first stitch of the hood so you always know where the 14 (20, 24) stitches begin and end.
- Make all five flowers before seaming so you can lay them out and balance the colors on the front.
Step-by-Step Instructions
Cocoon Body (Color A)
Row 1: Ch 43 (55, 67). Dc in 3rd ch from hook and each ch across. Turn. (41, 53, 65 dc)
Rows 2-46 (60, 72): Ch 2, dc in each st across. Turn. (41, 53, 65 dc)
Do not fasten off. Proceed to the Hood.
Hood (Color A)
Row 1: Ch 2, dc in same st, dc in next 12 (18, 22) sts. Turn. (14, 20, 24 dc)
Rows 2-16 (18, 20): Ch 2, dc in each st across. Turn. (14, 20, 24 dc)
Fasten off, leaving a long tail for seaming.
Assembly of Body and Hood
Fold the body in half lengthwise with right sides together. Whipstitch the side edges together, leaving the top 5" open for the hood. Fold the hood in half and seam its back edge. Turn the cocoon right side out.
Scalloped Edging (Color E)
Rnd 1: Join E at the bottom edge. Work sc evenly around the entire opening (hood and bottom), joining with a sl st to the first sc.
Rnd 2: *Sk 1 st, 5 dc in next st, sk 1 st, sl st in next st; rep from * around. Fasten off.
Flower Appliqués (make 5, one each in B, C, D, E, and A)
Rnd 1: MR, 6 sc. Join with sl st. (6 sc)
Rnd 2: Ch 3, 2 dc in same st, ch 3, sl st in same st (first petal made). *Sl st in next st, ch 3, 2 dc in same st, ch 3, sl st in same st; rep from * around. (6 petals)
Fasten off, leaving a tail for sewing.
Assembly and Finishing
Sew the five flowers randomly onto the front of the cocoon, using the photo as a guide and balancing the colors. Weave in all ends on the wrong side. Block lightly by misting with water and shaping flat, especially the scalloped edge and flower petals, then let it dry completely before use.
Pro Tips and Variations
- Swap the avocado green for a soft mustard or dusty rose to change the retro mood while keeping the same flower palette.
- Use a smaller hook (5.5 mm) for a denser, sturdier fabric if the cocoon will be used as a photo prop.
- Add a sixth flower to the hood or scatter a few tiny leaves between the flowers for extra 1970s charm.


